

Start with a filament (FDM) printer that arrives assembled and calibrates itself, load PLA, and print a ready-made model from a free library before you design anything. Put it in a ventilated room, watch the first layer, and let the plate cool before you take the part off.
Most beginner questions arrive in the same order: what kind of printer, which one, what to feed it, how to turn a model into a print, and how to get that first print to stick. This page follows that order. Each section gives you the short answer, then points to the guide that covers it in depth.
What is 3D printing, and which kind should you start with?
3D printing builds an object one thin layer at a time from a digital file. At home, that means one of two technologies. A filament printer, also called FDM or FFF, melts a plastic strand in a hot nozzle and draws each layer onto a heated bed. A resin printer cures liquid resin with light, layer by layer, which gives finer detail but adds gloves, ventilation and a wash-and-cure step in isopropyl alcohol and UV light. Uncured resin is a skin irritant, so resin suits careful adults with a space set aside for it.
If you want the mechanics first, our explainer on how a 3D printer works follows a model from file to finished part.
For a first printer, we’d start with filament. It handles the everyday things beginners want to make, such as hooks, boxes, toys and replacement parts. If miniatures or jewellery are the main reason you’re interested, read our filament or resin comparison before you decide. The rest of this page assumes a filament printer.
What does a beginner’s 3D printer need?
Three things decide how your first few weeks go: whether the printer sets itself up, how big it prints, and whether it has an enclosure. Our guide to choosing your first 3D printer goes through every specification; here is the short version.
Automatic calibration
The first layer has to go down at exactly the right distance from the bed, or the print won’t stick. Some printers make you level the bed by hand with a sheet of paper. Current beginner printers probe the bed themselves and correct for it, so you skip the most common cause of early failures. Treat automatic levelling as a must, and prefer a printer that arrives assembled.
Build size
The build volume is the largest object you can print in one piece. A 180 mm cube covers most household items, toys and gadgets; larger helmets, planters and storage boxes need a 220 mm or 256 mm bed, or printing in parts and gluing them. Bigger beds also mean a bigger machine on your desk, and a moving bed needs clear space in front and behind it.
Open frame or enclosed?
An open-frame printer is easier to watch and to clear, and it suits PLA, PETG and TPU. Materials such as ABS and ASA need a warm, enclosed chamber to stop parts warping. Bambu Lab, for example, does not recommend ABS, ASA, PC, PA or PET on its open A1 mini, and advises against putting that printer in an enclosure. If you already know you’ll print those materials, an enclosed printer such as the Elegoo Centauri Carbon is the better starting point. Most beginners won’t need one for months.
Our starting points
Our first choice for most beginners is the Bambu Lab A1 mini. It arrives assembled, runs its own calibration and prints at up to 500 mm/s, with a 180 × 180 × 180 mm build volume. The compact bed is the trade-off.
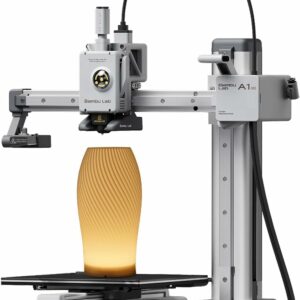
Assembled, self-calibrating and happy with PLA, PETG and TPU on its open frame. The 180 mm bed is the smallest of the printers we list, so choose bigger if you want large parts in one piece.
If you want a little more room, the Flashforge Adventurer 5M has a 220 × 220 × 220 mm build volume, one-click automatic levelling, a removable magnetic PEI plate and a quick-release nozzle. Flashforge says it’s ready to print about 10 minutes after unboxing. Like the A1 mini, it has no enclosure and is built for PLA, PETG and TPU.
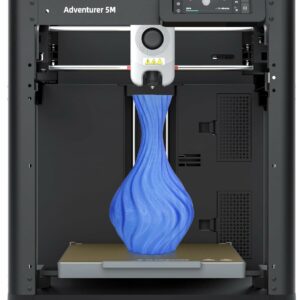
A CoreXY printer with a 220 mm build volume, one-click levelling and a nozzle that swaps quickly. It prints one colour at a time.
To compare more models side by side, see our ranked list of 3D printers, or browse every model in our printers for beginners section.
One colour or four?
Multicolour printing is tempting, but it isn’t a beginner requirement. A feeder such as Bambu Lab’s AMS lite switches between up to four spools during a print. Every change purges some filament, so multicolour prints take longer and use more material. If colour matters to you from day one, the Bambu Lab A1 Combo pairs a 256 × 256 × 256 mm printer with the AMS lite in the box.
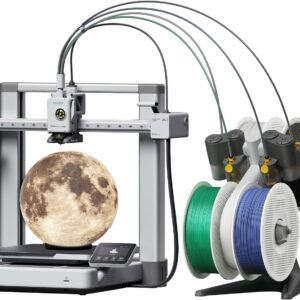
The full-size A1 with the AMS lite feeder included, for up to four colours in one print on a 256 mm bed. Expect longer prints and some purged filament on every colour change.
Which filament should a beginner use?
Start with PLA. Prusa Research calls it one of the easiest materials to print and notes that it isn’t prone to significant warping. CLEAPSS, in guidance produced with the HSE, recommends PLA as the main filament for schools, partly to reduce fumes and particle emissions compared with materials such as ABS. Most desktop printers take 1.75 mm filament, and a 1.75 mm PLA spool is the usual first filament for every printer we list.
Our guide to PLA filament covers the settings makers publish, the variants and storage, and the filament temperature chart lists the ranges for every common material.
PLA has limits worth knowing before you print something useful. It is brittle rather than flexible, it degrades in UV light, and it softens with heat: Prusa says it softens and deforms above 60 °C, and SUNLU gives a heat deflection temperature of 55 ± 5 °C for its PLA. That rules out parts for a car dashboard in summer or anything near a radiator. PETG is the usual next step when you need tougher, more heat-resistant parts.
Use the settings printed on your own spool or the maker’s page, not a figure from a forum. SUNLU PLA Filament, for example, publishes 200–210 °C at the nozzle for 50–100 mm/s, a 50–60 °C bed and a diameter tolerance of ±0.02 mm. CLEAPSS also suggests printing at the lower end of the supplier’s temperature range, since hotter nozzles produce more emissions.
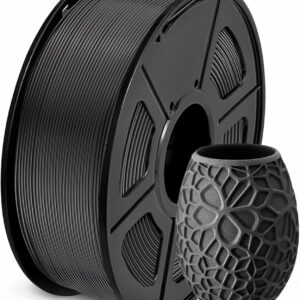
Everyday 1.75 mm PLA on a 1 kg spool with published settings for slow and faster printing. Check the 19.5 cm spool fits your printer’s holder or feeder.
Some filaments absorb moisture from the air, and some are sensitive to light. CLEAPSS advises storing them in sealed, dry and dark containers, so keep open spools in a lidded box rather than on a sunny shelf.
What is a slicer, and which one do you need?
A slicer is the program that turns a 3D model into instructions your printer can follow. It cuts the model into layers, works out the path of the nozzle for each one, and shows you a preview with the estimated print time. You’ll use it for every print.
Step-by-step guides take you from download to first slice: Bambu Studio for beginners for Bambu Lab printers and getting started with OrcaSlicer for most other brands.
Use the slicer your printer maker recommends first, because it comes with ready-made profiles for your machine and its filaments. Bambu Lab printers use Bambu Studio, which runs on Windows 10 or later and macOS 10.15 or later and opens .stl, .3mf, .step, .obj and .amf files. OrcaSlicer is an open-source alternative that started from Bambu Studio and PrusaSlicer and supports printers from Bambu Lab, Prusa, Creality, Voron and others. It adds calibration tools such as temperature towers and flow tests once you want to fine-tune.
A beginner only needs three choices: the printer, the filament and the layer height. Bambu Lab describes 0.20 mm as the norm for most prints, and the thinner the layers, the longer the print takes. Leave everything else on the default profile until you know why you’d change it. Our beginner’s guide to slicers walks through the settings that matter.
Where do you find things to print?
You don’t need to learn 3D design to start. Free model libraries such as Printables, MakerWorld, Thingiverse, MyMiniFactory and Cults3D hold ready-made designs for almost anything, and some offer files with print settings already chosen. Download the file in .stl, .obj or .3mf format and open it in your slicer. Some libraries also sell paid models to support the designers.
For a shortlist of rewarding first projects, see our 3D printing ideas by difficulty.
Every model comes with a licence, so read it. Many free models use a Creative Commons licence that asks you to credit the designer, and the non-commercial versions mean you can’t sell what you print. Good first prints are small and practical: a cable clip, a phone stand, a hook, a calibration cube. Designing your own parts in a free tool such as Tinkercad is a natural second step once you’ve printed a few.
What happens on your first print?
The first print is mostly about the first layer. Put the printer on a sturdy, level surface with room for the bed to move: Bambu Lab asks for about 390 mm of space for the A1 mini’s bed to travel front to back. Remove every transport screw and packing piece, then let the printer run its own setup and calibration.
Load PLA, choose a small model, and watch the first layer go down. It should be flat, even and stuck to the plate along its whole length. If it peels or drags, stop the print and check the plate is clean: Bambu Lab recommends washing its textured PEI plate with warm water and ordinary soap. When the print finishes, let the plate cool completely before you take the part off.
Our step-by-step guide to your first 3D print covers unboxing, loading and slicing in order.
Is 3D printing safe at home?
It can be, with the right material, a sensible spot and a few habits. CLEAPSS, whose guidance the HSE endorses, says the advice may also interest home users. It notes that emissions from heated filament may be a risk to health when inhaled, and that people with asthma or breathing difficulties are most at risk. Standing close to a running printer for long periods increases exposure.
- Ventilation: print in a well-ventilated room, and don’t sit beside the printer for hours while it runs.
- Material: PLA at the lower end of its temperature range, as above.
- Heat: CLEAPSS puts nozzle temperatures at 200–300 °C and heated beds at 50–100 °C; a freshly finished print can be hot enough to burn.
- Moving parts: keep hair, sleeves and small fingers clear of belts and the moving bed.
- Maintenance: switch off and let everything cool before you clean or touch the nozzle.
- Room conditions: follow the maker’s range; Bambu Lab gives 10–30 °C and humidity under 85 % for the A1 mini, so a freezing garage in winter may be too cold.
Our guide to fumes, enclosures and where to put a printer goes further.
Your first-month checklist
Use this as a rough plan rather than a schedule. Move on when the right-hand column is true, not when the week ends.
| When | Do this | Move on when |
|---|---|---|
| Before buying | Pick a spot near a socket in a ventilated room, with space for the bed to move | You know where it will live |
| Day one | Unbox, remove transport locks, run the printer’s own calibration | Setup finishes without errors |
| Day one | Load PLA and print a small test model | The first layer goes down flat and stays put |
| Week one | Install the recommended slicer and print three small models from a library | You can slice and send a file without help |
| Week two | Try a different layer height and compare the time and finish | You can predict which setting a print needs |
| Week two | Set up a sealed box for spare filament | Open spools no longer sit out |
| Week three | Print something useful for the house, such as a hook or a drawer divider | It fits and does its job |
| Week four | Make a simple part of your own in a free design tool | Your own file prints first time |
| Any time | Clean the plate when prints stop sticking | Adhesion is back to normal |
Once you’re through the list, you’re past the stage where most beginners give up. That’s the point to try PETG, a second nozzle size or multicolour.
Common questions
Do I need to know 3D design to start 3D printing?
No. Free model libraries hold more designs than you could print, and most beginners print other people’s models for weeks before designing anything. When you want to make your own parts, a free browser-based tool such as Tinkercad is an easy start.
Can I use a 3D printer without a computer?
Partly. The Bambu Lab A1 mini, for example, can start a print from its microSD card without an internet connection. You still need a computer to slice new models in a program such as Bambu Studio, and Bambu Lab notes that firmware updates need Wi-Fi.
What size filament do I need?
Most desktop printers take 1.75 mm filament, and it’s the usual size for the beginner printers we list. Some machines use 3 mm filament instead, and a printer can usually take only one size, so check the specification before you buy a spool.
Is PLA strong enough for useful parts?
For most things indoors, yes: hooks, organisers, brackets and replacement knobs all work well. PLA is brittle, softens from around 55–60 °C and degrades in UV light, so print PETG for parts that bend, get hot or live outdoors.
Sources
- G276 3D Printing in Schools and Colleges: Managing the Risks — CLEAPSS
- PLA — Prusa Knowledge Base
- A1 mini FAQ — Bambu Lab Wiki
- Bambu Studio Quick Start Guide — Bambu Lab Wiki
- OrcaSlicer — OrcaSlicer on GitHub
- Where can you get 3D models? — Prusa Knowledge Base