

Under-extrusion means your printer lays down less plastic than the slicer asked for, so you get gaps between lines, thin or see-through walls and weak, spongy parts. Fix it in this order: the filament path and spool, moisture, temperature for your speed, a partial clog, and only then flow calibration.
How do you know it is under-extrusion?
You know it is under-extrusion when the lines of plastic don’t meet: small gaps between lines or perimeters, top surfaces that won’t close, and walls that are thinner and weaker than they should be. Prusa describes the classic sign as small gaps between layer lines or perimeters.
For the temperature ranges makers publish for each material, see our filament temperature chart.
To confirm it, Simplify3D suggests a quick test: print a 20 mm tall cube with at least three perimeters and look at the top. If there are gaps between the three outlines instead of one solid band, you are under-extruding.
Two look-alikes are worth ruling out. If only the first layer is thin, patchy or lifting, start with nozzle height and fixes for prints not sticking to the bed. If layers are complete but step sideways, that is layer shifting, a different fault.
Try this first: match the symptom to the cause
Watch and listen to a print for a few minutes, then start where this table points.
| What you see or hear | Most likely cause | Start with |
|---|---|---|
| Clicking from the extruder, plastic shavings near the gears, gaps that come and go | Filament can’t feed freely | Cause 1 |
| Popping or hissing, bubbles, rough or pitted surface, more stringing than usual | Damp filament | Cause 2 |
| Slow walls look fine, fast infill and long straight moves have gaps | Nozzle too cool for the speed | Cause 3 |
| Thin lines, filament curls up and sticks to the nozzle when you purge | Partial clog | Cause 4 |
| Small, even gaps everywhere, on every spool, after the above are ruled out | Flow ratio set too low | Cause 5 |
Before you touch the nozzle or the extruder, let the hotend cool and unplug the printer. For anything that involves removing parts, follow your printer maker’s manual.
Causes of under-extrusion, most likely first
1. The filament can’t feed freely
Symptom: gaps that come and go, a clicking extruder, or plastic dust around the drive gears.
Why: the extruder pushes a set length of filament for every move. A crossed winding, a spool that binds on its holder or a kinked tube adds drag, and the gears slip instead of feeding. Prusa explains that clicking means the motor is skipping steps against too much resistance, and that residue in the gear teeth reduces their grip. Simplify3D calls the end result grinding: the gear keeps turning while the filament stays still.
Fix: unwind a few turns by hand and check for crossed windings, spin the spool to make sure it turns freely, and look for kinks in the tube. With the printer cold and unplugged, clean the gear grooves; Prusa suggests a toothpick. Then check your slicer: the filament diameter setting must match your filament, usually 1.75 mm or 2.85 mm according to Simplify3D, and it suggests measuring the filament with callipers. As an example, SUNLU publishes a ±0.02 mm diameter tolerance for the SUNLU PLA Filament.
2. The filament is damp
Symptom: popping or hissing at the nozzle, bubbles, a rough or pitted surface, extra stringing and weak, brittle layers.
Why: many filaments absorb moisture from the air. According to Polymaker, that water turns to steam in the hotend and disrupts extrusion, which leads to bubbling and poor layer adhesion.
Fix: dry the spool at the temperature and time on its own data sheet. A heated dryer such as the SUNLU FilaDryer S2 lets you dry the spool and print from it in one go. Afterwards, store your filament so it stays dry, or the problem comes back. If a dried spool still leaves fine hairs between parts, our guide to stringing causes and fixes covers the rest.
3. The nozzle is too cool for your print speed
Symptom: slow outer walls look fine, but fast infill and long straight moves are gappy, sometimes with clicking.
Why: a hotend can only melt so much plastic per second. OrcaSlicer‘s calibration guide notes that temperature affects how the filament flows, and that its maximum volumetric speed test exists to keep the printer within the flow it can handle without under-extrusion. Filament makers publish hotter settings for faster printing: for the SUNLU PLA Filament, SUNLU gives 200–210 °C at 50–100 mm/s and 210–240 °C at 100–200 mm/s.
Fix: check that your nozzle temperature matches the filament’s published range for the speed you print at. If the filament is grinding, Simplify3D suggests raising the extruder temperature by 5–10 °C, staying within that range, or halving the default print speed to see whether the grinding stops. If your slicer has a maximum volumetric speed setting, run its test and set the limit in the filament profile.
4. A partial clog
Symptom: Prusa lists filament that doesn’t come out consistently, printed lines that look much thinner, and filament that curls up and sticks to the nozzle when purged. Partial clogs often show up mid-print, even when loading and unloading worked.
Why: debris or burnt plastic narrows the path through the hotend, so less plastic gets through.
Fix: Prusa calls a cold pull a good place to start. Use the temperatures in your printer maker’s guide, not a figure from another machine. After the clog clears, clean the extruder gears again, since Prusa notes they collect residue from grinding. If nothing comes out at all, the nozzle is fully blocked, and clearing a clogged nozzle is a separate job with its own steps.
5. The flow ratio is set too low
Symptom: small, even gaps between lines on every print and every spool, with causes 1 to 4 ruled out.
Why: the flow ratio, called the extrusion multiplier in some slicers, scales how much filament is pushed; 1.0 means 100 %. Prusa gives a typical range of 0.9 to 1.1 and notes that the right value changes with filament type, colour and even from spool to spool.
Fix: run your slicer’s flow calibration and save the result in that filament’s profile. Prusa’s visual method changes the value by 1–2 % at a time until the top surface is smooth. Its precise method prints a single-wall cube in vase mode: divide the line width set in the slicer by the average wall thickness you measure. Simplify3D’s quicker route is to add 5 % and reprint the test cube.
Do this step last. OrcaSlicer’s calibration guide puts temperature and maximum volumetric speed before flow ratio, so a flow value tuned on a damp spool or a cold nozzle will be wrong once those are fixed.
When to replace instead
Replace a part when the same fix stops holding:
- The spool: if it measures outside its maker’s published tolerance, or still pops after a full drying cycle, keep it for test prints.
- The nozzle: if a cold pull clears it but the clog keeps coming back, fit a new one as your printer’s manual describes. Some printers make this quick: the Flashforge Adventurer 5M has a quick-release nozzle and the Bambu Lab A1 Combo a one-clip swap.
- The extruder gears: if they still slip after cleaning, replace them following the maker’s manual.
- The printer: if spare parts are no longer sold, compare current machines in our printer rankings.
If you’d rather not calibrate flow by hand for every new spool, the A1 Combo is where we’d start: according to Bambu Lab, it calibrates flow automatically, along with Z-offset, bed levelling and vibration compensation. Causes 1 to 4 still apply to it, since no calibration fixes a tangled spool or a damp filament.
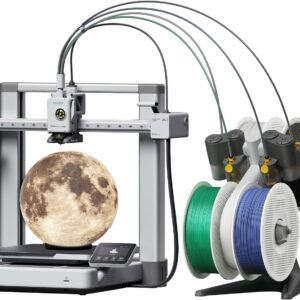
A new spool needs less tuning by hand, because flow calibration is automatic, according to Bambu Lab. The included AMS lite feeds up to four colours on a 256 × 256 × 256 mm build volume.
Common questions
Why does my extruder click during a print?
Clicking usually means the extruder motor is skipping steps because the filament meets too much resistance. Check the spool and filament path first, then the nozzle temperature for your speed. If both are fine, a partial clog is the next suspect.
Why do I only get gaps at high speed?
At high speed the hotend has to melt more plastic every second, and every setup has a limit. Raise the temperature within the filament’s published range, slow down, or set a maximum volumetric speed in your slicer so it never asks for more than the hotend can melt.
Should I just increase the flow rate?
Not as a first step. A higher flow value can hide a damp spool, a cold nozzle or a partial clog, and it will be wrong once the real cause is fixed. Rule those out first, then calibrate flow for each filament.
Is under-extrusion the same as a clogged nozzle?
No. A partial clog is one cause, but damp filament, a dragging spool, a cool nozzle or a low flow ratio leave the same gaps. With a fully clogged nozzle, almost nothing comes out at all.
Sources
- Under-Extrusion — Simplify3D
- Grinding Filament — Simplify3D
- Extrusion multiplier calibration — Prusa Knowledge Base
- Clogged nozzle/hotend (MK3.5/S, MK3S+, MK2.5S) — Prusa Knowledge Base
- Wet Filament — Polymaker Wiki
- Calibration Guide — OrcaSlicer Wiki