
A slicer is the program that turns a 3D model into layer-by-layer instructions, called G-code, that tell your printer where to move the nozzle, how much plastic to push and how hot to run. Bambu Studio and OrcaSlicer are both free, and a beginner only needs five settings: printer, filament, layer height, infill and supports.
Everything else can stay at the defaults while you learn. Here are the five, with a sensible starting point for each.
New to all of this? Start with our beginner’s guide to 3D printing, which takes you from choosing a printer to a first successful print.
| Setting | What it changes | Where to start |
|---|---|---|
| Printer profile | Bed size, nozzle size and the machine’s limits | Your exact printer and the nozzle fitted |
| Filament profile | Temperatures, fan and flow for one material | Your brand’s profile, or the generic one for that material |
| Layer height | Surface detail against print time | 0.20 mm on a 0.4 mm nozzle |
| Infill | What is printed inside the walls | 10–15 % for most models |
| Supports | Props under overhangs | Only when part of the model would start in mid-air |
What does a slicer actually do?
It turns a shape into a to-do list for the printer. A model file, such as an STL, only describes the outside of an object. The printer needs commands: move here, push this much filament, heat to this temperature.
The slicer cuts the model into thin horizontal layers, like a sliced loaf. It plans the paths in each layer: outer walls, infill and any supports. Then it adds temperatures, fan settings and speeds from your profiles, and saves one file the printer can run. The preview shows the result layer by layer, with the estimated print time in Bambu Studio, so you can catch a floating section before it reaches the plate.
The model itself comes from your own design or a library of ready-made files; our guide to finding free 3D models compares the big three.
Bambu Studio or OrcaSlicer: which should you install?
Bambu Studio if you own a Bambu Lab printer, OrcaSlicer if you own another brand or want to tune filaments yourself. Both are open source under the AGPL-3.0 licence and run on Windows, macOS and Linux.
| Published facts | Bambu Studio | OrcaSlicer |
|---|---|---|
| Made by | Bambu Lab | The OrcaSlicer open-source project |
| Based on | PrusaSlicer | Bambu Studio and PrusaSlicer |
| Printer presets | Bambu Lab, plus some other brands | Bambu Lab, Prusa, Creality, Voron and more |
| Official download | Bambu Lab, or its GitHub releases | orcaslicer.com, or its GitHub releases |
- Bambu Studio is the shortest route on a Bambu printer: Bambu recommends its own filaments with its own presets for the best quality and speed, and the slicer can send jobs straight to the printer over your network.
- OrcaSlicer suits other brands, mixed setups, or dialling in a filament with its built-in calibration tests.
- Download from official sources only. OrcaSlicer’s developers warn that look-alike sites may lead to dangerous downloads.
Our worked example is the Bambu Lab A1 mini, with a 0.4 mm nozzle as standard and a 180 × 180 × 180 mm build volume. Still choosing? Compare models in our ranked list of 3D printers.
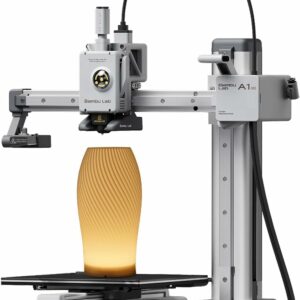
It arrives assembled and calibrates itself, and both slicers carry ready-made profiles for it. The trade-off is the 180 mm bed, the smallest of the printers we list.
What you need
- A computer. For Bambu Studio: Windows 10 or later, macOS 10.15 or later, or Ubuntu or Fedora Linux, ideally with 8 GB of RAM (4 GB at least).
- A model file. STL or 3MF; Bambu Studio also opens STEP, OBJ and AMF.
- Your nozzle size and filament type. Check both before you start.
- A route to the printer: your network, or a microSD card on printers that take one.
The five settings a beginner actually touches
1. Printer profile: which machine and nozzle
It tells the slicer the bed size, the nozzle fitted and the machine’s limits. In Bambu Studio the Printer drop-down includes the nozzle size. The A1 mini also takes 0.2, 0.6 and 0.8 mm nozzles, and OrcaSlicer has A1 mini profiles for all four. Swap a nozzle, change the profile; our guide to choosing a nozzle size covers when that’s worth it.
2. Filament profile: which plastic
It holds the temperatures, fan speeds and flow for one material. Pick your exact brand if it’s listed; if not, pick the generic profile, such as Generic PLA. Bambu says its generic presets are tuned conservatively to suit a wide range of filaments.
Then check the profile against the maker’s figures. SUNLU PLA Filament, for example, lists 200–210 °C at 50–100 mm/s and a 50–60 °C bed. If the profile sits outside that, edit it and save your copy as a new preset.
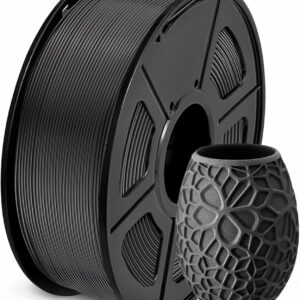
Plain 1.75 mm PLA to build your first filament profile around. SUNLU also publishes a hotter 210–240 °C range for 100–200 mm/s, so you can match the profile’s temperature to how fast you print.
3. Layer height: detail against time
Thinner layers hide the lines on the surface, but the printer lays down more of them. In Bambu Lab’s example, one model took 1 h 19 min at 0.08 mm, about 36 min at 0.20 mm and about 28 min at 0.28 mm.
Bambu calls 0.20 mm the norm. Its layer-height guide suggests 20–70 % of the nozzle diameter (0.08–0.28 mm on a 0.4 mm nozzle), and its nozzle guide a slightly higher 25–75 % (0.1–0.3 mm). Our rule: stay at 0.20 mm, drop towards 0.08 mm for a figure where lines would show, and go towards 0.28 mm for a quick part where looks don’t matter.
4. Infill: the inside of the part
Infill is the pattern inside the walls. It holds up the top surface and changes print time and filament use. Prusa says most models print fine at 10–15 %, and that strength comes mostly from the number of perimeters (Bambu Studio calls them wall loops), not from infill. So add a wall before you raise the infill. Patterns and percentages are in our guide to how much infill you need.
5. Supports: props under overhangs
Supports hold up parts of a model that would otherwise start in mid-air, and come off after printing. With an auto type, Bambu Studio supports any surface sloping at less than the threshold angle from horizontal: 30° by default, an angle Bambu says most materials can print at without support.
Bambu says normal supports give a better finish under large flat overhangs, while tree supports use less material and time on many small, curved ones. Placement and clean removal are covered in our guide to when you need supports.
Step by step: slice your first model
These are Bambu Studio’s labels; OrcaSlicer asks for the same choices.
- Download the slicer from its official source and install it.
- In the setup wizard, tick your printer and nozzle size.
- Tick the filaments you use.
- Click New Project.
- Drag your STL or 3MF file onto the plate.
- Choose your printer and nozzle in the Printer drop-down.
- Choose the loaded filament in the Filament drop-down.
- Choose a 0.20 mm preset in the Process drop-down.
- Switch supports on only if the model has overhangs.
- Click Slice.
- Scroll through the layers in the preview.
- Click Print, or export the sliced file to the microSD card.
New printer? Our first-print walkthrough runs from unboxing to taking the part off the plate.
Mistakes to avoid
- The wrong nozzle in the profile. Every line is planned for the nozzle you select.
- More infill for strength. Add a wall first.
- Skipping the preview. Scroll through it every time.
- Changing several settings at once. Change one, print, compare.
- Blaming the slicer when a print won’t stay down. Work through our fixes for prints not sticking first.
What to try next
Once the five feel routine, try variable layer height, which puts fine layers only where a model needs detail: Bambu says it keeps the quality while saving print time. In OrcaSlicer, the temperature tower and flow rate, pressure advance and retraction tests help you tune a filament you use a lot.
Common questions
Is a slicer the same as 3D design software?
No. Design software such as Tinkercad is where you create or change a shape. A slicer takes a finished model and works out how the printer should build it. You need a slicer for every print, but design software only for your own models.
Can I use OrcaSlicer with a Bambu Lab printer?
Yes. OrcaSlicer includes Bambu Lab printers among its presets, with A1 mini profiles for each nozzle size. Bambu’s networking plug-in, which adds extra functions for Bambu printers, is optional and not open source.
Can I print an STL file without slicing it?
No. An STL file only describes a shape, and the printer needs instructions it can follow. Every print goes through a slicer first, even when an app or a ready-sliced download has done that step for you.
Do I need an account to use Bambu Studio?
No, but Bambu strongly recommends logging in. An account keeps a print history you can reprint from the Bambu Handy app and syncs your settings between computers.
Sources
- Bambu Studio Quick Start Guide — Bambu Lab Wiki
- Layer height — Bambu Lab Wiki
- Support — Bambu Lab Wiki
- BambuStudio — Bambu Lab on GitHub
- OrcaSlicer — OrcaSlicer on GitHub
- Infill — Prusa Knowledge Base