

You need supports wherever part of a model would start in mid-air: overhangs leaning more than about 45° from vertical, ledges held at one end and long bridges. Turn the model first so fewer are needed, use tree supports for figures and normal ones for big flat undersides, leave a small gap at the interface and remove them soon after printing.
The settings below use Bambu Studio’s names, with the Bambu Lab A1 mini as the worked example; other slicers use similar labels. New to slicing? Start with what a slicer does. Resin printers use supports differently, so this guide covers filament printers only.
When does a 3D print need supports?
When a layer would have nothing underneath it. Each layer is laid on the one below, so a part that starts in mid-air, or an edge that leans out too far, droops without a prop.
The 45-degree rule
Up to about 45° from vertical, each new layer still rests partly on the last one and the printer copes. Prusa puts the clean limit at 45–60°, depending on nozzle diameter and settings, and says it may fall below 45° with a small nozzle such as 0.25 mm: worth remembering if you fit the 0.2 mm nozzle on an A1 mini.
Slicers measure from the horizontal instead. Bambu Studio supports any surface flatter than its threshold angle: 30° by default, which Bambu calls safe without support for most materials. That is 60° from vertical, so the default is more permissive than the 45-degree rule; a larger threshold adds more supports, and 45° matches the rule. Our rule: start at 30°, raise it towards 45° if overhangs droop, and lower it if supports appear where they aren’t needed.
Bridges, ledges and floating parts
A bridge is a flat span held at both ends, like the top of a doorway. Bambu says a short bridge prints well unsupported and that the safe length varies by material, so no single figure applies. A ledge held at one end only, which Bambu calls a cantilever, needs support however small it is.
Run this check before you slice:
- Anything starting in mid-air? Support it.
- An overhang leaning more than 45° from vertical? Support it, or turn the model.
- A flat span held at both ends? Try it as a bridge first.
- A ledge held at one end? Support it, whatever its size.
How to orient a model so it needs fewer supports
Turn the model before you add a single support. Prusa notes that a face printed on the bed comes out flat and smooth, while one printed over supports looks rougher. So put the largest flat face down and keep the side people will see away from supports.
Bambu Studio’s auto-orientation button weighs this for you: Bambu says it favours a small overhang area, a large base and no supports on visible surfaces, but it can misjudge bridges, so check its choice. For a part that takes a load, remember Prusa’s point that prints, like wood, are stronger in one direction.
When no orientation works, cut the model. Bambu Studio’s Cut tool (press C) splits it along a plane so each piece can sit flat, and its dovetail mode adds interlocking joints. For gluing, Prusa advises clean, grease-free faces, a light sanding and pegs for alignment.
Designing your own part? Prusa warns that a fillet facing the bed makes a steep overhang and suggests a chamfer when the finish matters; our beginner’s guide to Tinkercad covers the basics. If the file came from one of the free 3D model libraries, read its page for the designer’s orientation or support notes.
Normal or tree supports: which should you use?
Normal for large flat overhangs, tree for figures and curved shapes. Normal supports project the overhang straight down to the bed; tree supports grow branches that can steer around the model.
| Your model | Bambu Studio choice | Why, according to Bambu |
|---|---|---|
| Box, bracket, flat shelf | Normal, Grid style | Better surface under large flat overhangs |
| Figure, animal, organic shape | Tree, Slim or Organic style | Less material and time on small curved overhangs, similar finish |
| A mix of both | Tree, Hybrid style | Normal grid under big flat areas, branches elsewhere |
| One or two problem spots | Normal or Tree (manual) | Supports only where you paint them |
Avoid the Tree Strong style on delicate parts: Bambu says its branches are sometimes difficult to remove. For full control, use support painting: paint enforcers where you want supports and blockers where you don’t. Blockers are the quickest way to keep supports off a face people will see.
Which interface settings make supports easier to remove?
The gap and the interface layers. The interface is the dense top of the support that touches your model; the rest is the base.
| Setting | What it changes | Where to start |
|---|---|---|
| Top Z distance | Gap between support and model | About 0.2 mm in the model’s own filament (Bambu); 0 only with a support filament |
| Top interface layers | Dense layers under the model | Bambu shows 3 giving a flat, stable platform; 0 lets lines sag |
| Support/object XY distance | Side gap to the walls | Bigger is easier to remove and less likely to fuse (Prusa) |
| Interface pattern | Lines touching the model | Rectilinear suits most cases; grid and interlaced are harder to detach |
| Base pattern | Fill inside the support | Rectilinear grid is stronger but harder to remove |
Bambu sums up the trade-off: a bigger gap means easier removal but a rougher underside. Prusa suggests 50–75 % of the layer height in PrusaSlicer. Change one setting at a time: if supports fuse, widen the gap; if the underside sags, add an interface layer. The base works much like the infill inside a part, explained in our guide to how much infill you need.
What you need
- A printer and its slicer. This guide uses the Bambu Lab A1 mini with Bambu Studio. Still choosing? See our ranked list of 3D printers.
- Removal tools. Pliers, nippers, a sharp knife, and a deburring tool or files.
- Safety glasses. Prusa warns that support pieces can be sharp and sometimes fly off in a random direction.
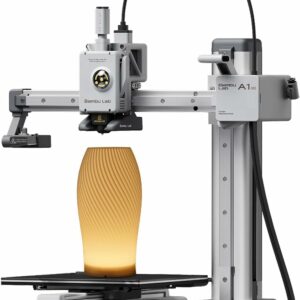
It arrives assembled and calibrates itself, and Bambu Lab’s own slicer has every support setting in this guide. The 180 × 180 × 180 mm build volume is compact, so bigger models often need cutting into parts.
Step by step: from model to clean part
- Import the model into Bambu Studio.
- Click auto-orientation, then check the result.
- Cut the model if no orientation avoids large overhangs.
- Enable supports and pick a type from the table above.
- Leave the threshold angle at 30° for a first print.
- Paint blockers on any surface people will see.
- Set the top Z distance and interface layers.
- Slice, then scroll through the preview for anything starting in mid-air.
- Print.
- Take the part off the plate as your manual describes.
- Put on safety glasses and remove the supports.
How to remove supports cleanly
Do it soon. Bambu advises removing supports within two hours, especially with moisture-hungry materials such as nylon and PVA, which soften and leave residue once damp. If a print has sat too long, Bambu suggests drying it and letting it cool first.
Prusa says supports often come away by hand, with pliers for hard-to-reach places and a scalpel or craft knife for a stuck piece. Lift large sections first, snip what remains with nippers rather than twisting it, then smooth the marks with a deburring tool and files. The Creality 3D Printer Tool Kit Pro holds all of these in one case.

Seventy-four pieces, including pliers, nippers, spatulas, files and a deburring tool, so every stage of removal is covered. The blades and needles are sharp: keep the case out of children’s reach.
Mistakes to avoid
- A top Z distance of 0 in ordinary filament. Bambu says the supports become really hard to remove.
- Supporting every bridge. Use Don’t support bridges for normal supports, or Max bridge length for tree supports.
- Printing without checking the preview. Prusa advises verifying that every part is either supported or at an overhang angle your printer can manage.
- Leaving the print overnight. Remove supports within two hours.
What to try next
Print the interface in a dedicated support filament. Bambu says this lets you set the top Z distance to 0 and still remove the support easily, for a smooth underside. It recommends support filament for the interface only, to save time and filament, and warns that mismatched pairs, such as a PLA support filament under ABS, can clog the nozzle. On the A1 mini, a second filament means adding the optional AMS lite, and Bambu Lab keeps absorbent PVA out of the AMS lite, so choose a support filament it lists as AMS lite compatible.
Common questions
Can I print a model without any supports?
Often, yes. If nothing starts in mid-air and every overhang stays within about 45° from vertical, it prints unsupported. Turning the model, cutting it into parts or adding chamfers gets many models there.
Why do my supports fuse to the print?
Usually the gap is too small. Raise the top Z distance and the XY distance a little, and avoid the grid interface pattern. Removing supports soon after printing helps too.
What is the difference between a raft and supports?
A raft is a type of support printed under the model to lift it off the bed; Bambu suggests it for warp-prone materials such as ABS. Supports prop up overhangs, while a raft holds up the base.
Do supports leave marks on the model?
Yes, to some degree: a surface printed over supports is rougher than one printed on the bed. A smaller gap gives a smoother underside but is harder to remove, and a dedicated support filament gives you both.
Sources
- Support — Bambu Lab Wiki
- Auto Orientation — Bambu Lab Wiki
- Cut Tool — Bambu Lab Wiki
- Support Painting Tool — Bambu Lab Wiki
- Support material — Prusa Knowledge Base
- Modeling with 3D printing in mind — Prusa Knowledge Base