Work on a heat-resistant mat in a ventilated room, load the filament once the ready light comes on, and press the nozzle onto the surface before you move. Then trace a flat shape, draw a line upwards, weld pieces into a 3D shape, and reverse the filament out before you switch off.
This plan takes you through the first hour in seven stages, with a checkpoint for each so you know when to move on. The button and light steps follow the SCRIB3D P1’s manual; other pens use different controls, so keep your own manual open beside you.
Want something ready to trace? Download our free printable 3D pen templates, with shapes, letters and simple 3D builds on A4 pages.
| Stage | Move on when |
|---|---|
| Set up | Nothing flammable or wet sits near the nozzle |
| Heat and load | Plastic comes out smooth and even |
| First lines | Lines stay down and don’t curl round the nozzle |
| Flat shape | The shape peels off in one piece |
| Line upwards | A short line stays upright after you pull away |
| Join pieces | A small pyramid stands on its own |
| Finish | The pen is empty, unplugged and cold |
What you need before you switch on
- Your pen, its adapter and its manual. The SCRIB3D P1 has no built-in battery: it runs from its 5 V 2 A adapter or, according to its manual, a power bank with at least 2 A output.
- Filament your pen takes. Check the plastic and diameter in the manual. The SCRIB3D P1 takes 1.75 mm PLA and ABS; low-temperature pens such as the 3Doodler Start+ take only their own plastic.
- A silicone mat. Hot filament sticks to wood and can melt a plastic tablecloth, so the surface under your pen matters more than it looks.
- A stencil from the box, and small scissors for snipping strand ends.
- A room you can air, with no basin or other container of water nearby: SCRIB3D and 3Doodler both warn against using their pens near water.
Check the age rating first. SCRIB3D’s product page rates the P1 for ages 14 and up, and its manual says adult use only. For younger children, 3Doodler UK says the Start+, which has no external hot parts according to 3Doodler, is designed for ages 6 to 13; LIHUACHEN rates its hot-nozzle RPC200B for 7 and over, and any hot pen needs an adult beside a child.
If your pen came without a mat, the AQTAQ 3D Pen Starter Kit adds a 45 × 28 cm silicone mat rated 220–260 °C, 40 templates, four finger guards and 50 m of PLA. You’ll find more mats, finger guards and other accessories in the shop.
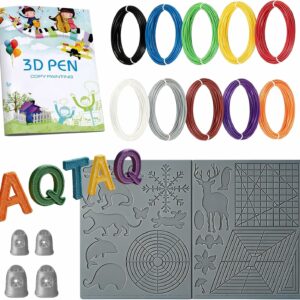
The mat’s 220–260 °C rating covers PLA and ABS pen temperatures, and the templates give you something to trace from day one. The pen itself isn’t included.
Start with PLA if your pen takes it. In a study published in Science of the Total Environment, ABS had the highest particle emission rates from 3D pens, ahead of PLA and then PCL, and also released styrene and benzene. See how PLA and ABS compare, or our guide to PLA, ABS and PCL.
Step by step: your first hour with a 3D pen
Stage 1: set up a safe workspace
- Lay the silicone mat flat on a clear table.
- Move paper, fabric and anything flammable away from the nozzle.
- Open a window.
- Sit so your face isn’t directly above the nozzle.
A NIOSH study of children’s 3D pens and printer toys found that nozzle temperature, filament type, colour and extrusion speed all significantly influenced particle and VOC emissions, and called for controls in poorly ventilated rooms or near a child’s breathing zone. SCRIB3D’s manual says to always use the P1 in a well-ventilated area.
Stage 2: heat the pen and load the filament
- Plug the adapter into a wall socket and into the pen.
- Choose the mode that matches your filament, PLA or ABS.
- Press the forward button to start heating. The temperature light stays red while it heats.
- Snip the end of the strand straight across.
- When the light turns green, hold the forward button down, or double-click it for continuous feed, with the speed at maximum.
- Push the strand in until you feel the pen pull it.
- Let plastic run onto the mat until it comes out smooth.
Go by the ready light, not the clock. Then fine-tune: SCRIB3D says to lower the temperature by 5–10 °C if the plastic bubbles or crackles, and raise it by 5–10 °C if the colour looks dim and the motor sounds strained. Oozing after you stop, more common with PLA, also means slightly less heat. To switch the P1 between PLA and ABS, unplug it and plug it back in.
Stage 3: draw your first lines
- Hold the pen like a pencil, tilted well up: SCRIB3D suggests 65° or more for flat drawing.
- Start the flow and press the nozzle onto the mat.
- Hold it there for a couple of seconds so the plastic anchors.
- Drag the pen slowly and steadily.
- Stop the flow, then lift away.
3Doodler calls steps two and three anchoring: the downward pressure helps the plastic stick, and its manual gives the same move as the fix for plastic that curls round the nozzle. If the line thins and snaps, slow your hand or raise the flow; if it piles into blobs, do the opposite. Practise straight lines, a zigzag and a spiral.
Stage 4: fill a flat shape on a stencil
- Lay a stencil on the mat, or under a transparent drawing board if your kit has one.
- Trace the outline in one continuous line.
- Fill the inside with touching lines.
- Let it cool, then peel it off slowly.
Make a square and four triangles with sides the same length as the square’s: you’ll need them in stage 6.
Stage 5: draw your first line upwards
- Build an anchored blob about the size of a ladybird.
- Keep extruding and lift straight up, about 4 cm.
- Stop the flow without moving the pen.
- Hold still for five or six seconds while the plastic sets.
- Pull the pen away.
That’s the method 3Doodler’s manual teaches for drawing in the air. Once one line stands, draw a row and join their tops.
Stage 6: join flat pieces into a pyramid
- Stand two triangles on the square, edge to edge.
- Run the nozzle along the joint with a little flow to weld it.
- Add the other two triangles the same way.
- Weld the tip.
3Doodler calls this welding: touching the tip to both pieces you want to join. Keep your fingers clear, or wear a finger guard.
Stage 7: unload the pen and switch off
- While the pen is hot, reverse the strand out completely.
- Snip off the melted end.
- Switch off and unplug.
- Leave the pen on the mat until the nozzle is cold.
- Store opened filament sealed and dry.
SCRIB3D warns that filament only partly withdrawn can swell inside the pen and jam it. 3Doodler’s power-down steps also start with reversing all the plastic out. The P1 sleeps when idle, but switch it off yourself.
Five beginner mistakes, and how to fix them
- Hovering above the surface. The plastic won’t stick. Press the nozzle down and anchor before you move.
- Moving faster than the plastic flows. The line stretches and breaks. Slow your hand first, then adjust the speed.
- The wrong mode or temperature. SCRIB3D says a mismatched mode gives poor results and may damage the pen. Match the mode to the strand and tune the heat by the signs in stage 2. Damp filament can bubble too, so keep strands sealed.
- Loading a ragged end. SCRIB3D says a strand without a flat end can cause jams or stop the pen extruding. Snip every strand, including at colour changes.
- Pulling the strand out by hand. 3Doodler says not to pull plastic from the back except as directed. Reverse it out, and if the pen blocks, see how to clear a clogged pen.
What to try after your first hour
Once you can anchor, fill and weld, move on to easy beginner projects that reuse the same moves: bookmarks and keyrings build on stage 4, small boxes on stage 6. Don’t chase tidy edges yet; clean lines on a stencil come once the basics feel easy.
If your pen held you back, with no way to set the temperature, change the speed or switch to ABS, those are the specs to check before you buy another. Our guide to choosing a 3D pen by its specs explains each one, and our ranked list of 3D pens sets the SCRIB3D P1 against the others.
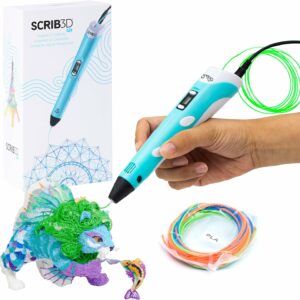
The pen we’d suggest to most first-time buyers: PLA and ABS modes with published temperature ranges, a stepless speed slider and auto sleep, with PLA and a stencil guide in the box. SCRIB3D rates it 14+ on its product page (its manual says adult use only), so it suits a teenager or grown-up beginner.
Common questions
Why does the plastic curl round the nozzle?
It usually means the nozzle is hovering instead of pressing on the surface. 3Doodler’s fix is to stop, start again and push the nozzle firmly down so the plastic sticks, letting it flow for a couple of seconds before you move. Then drag slowly and steadily.
Can I leave the filament in the pen between sessions?
It’s better not to. Reverse it out while the pen is hot, snip the end and store it sealed. SCRIB3D warns that partly withdrawn filament can swell and jam.
What should I do if I touch the hot nozzle?
The NHS says to hold a burn under cool running water for 20 minutes and not to put creams, oils or butter on it. In the UK, call NHS 111 if you’re not sure what to do, or 999 for a very large or deep burn; elsewhere, call your local emergency number for a serious burn.
How long can I draw with a 3D pen in one go?
3Doodler’s manual for its Create pen recommends switching off for 30 minutes after every 2 hours of continuous use. SCRIB3D’s manual gives no limit for the P1, so check your own pen’s manual.
Sources
- User Manual Scrib3D P1 — SCRIB3D
- Getting the most out of your 3Doodler Create — 3Doodler
- Flow: getting started — 3Doodler
- Evaluation of particle and volatile organic compound emissions during the use of 3D pens — Science of the Total Environment, via Europe PMC
- Particle and organic vapor emissions from children’s 3-D pen and 3-D printer toys — NIOSH, CDC Stacks
- Burns and scalds — NHS