

Here are twelve Christmas decorations to draw with a 3D pen, from easy to ambitious, each with the time to allow and what you need. They all rest on two skills: tracing a stencil flat and joining pieces. Step outlines for a snowflake, a bauble and a small tree follow the list.
Want something ready to trace? Download our free Christmas 3D pen templates: baubles, snowflakes, a stand-up tree, a reindeer and gift tags on eight A4 pages. Our general template pack adds shapes, letters and simple 3D builds.
Which Christmas idea should you start with?
Start with a stencil snowflake, whoever is holding the pen: every 3D idea below is flat pieces like it, joined together. After that, match the idea to the drawer. Younger children do best with the easy flat ideas and the wrapped baubles. The 3Doodler Start+ can join simple 3D shapes too, but its low-temperature plastic stays softer than PLA, so leave the tree and the lettering to confident drawers with a hot 1.75 mm PLA pen.
If the pen is brand new, start with your first hour with a 3D pen before you move on to decorations.
12 Christmas decorations, grouped by difficulty
Times are rough planning guides for one decoration, cooling included, not measured figures. First attempts and small hands take longer.
Easy: flat pieces on a stencil
1. Stencil snowflakes. Trace a printed snowflake, add a loop to one arm and thread a ribbon through, as in 3Doodler’s free project for its Start pen. Allow about 15 minutes. You need white or clear filament, a stencil and ribbon.
2. Hanging stars. Outline a star, fill it with zigzags so it doesn’t flex, and finish with a doubled loop at one point. Allow about 20 minutes. You need gold or yellow filament and a star stencil.
3. Personalised gift tags. Following 3Doodler’s method, outline a festive shape, write a name in the centre, fill the rest and add a loop. Write slowly so the letters stay legible. Allow about 15 minutes per tag. You need two contrasting colours.
4. Candy canes. Draw a thick white hook, let it cool, then lay red diagonal stripes over it. Allow about 10 minutes. You need white and red filament.
5. A 3D Christmas card. 3Doodler suggests drawing straight onto card stock, so holly or a robin stands proud of the front. Allow 20 to 30 minutes. You need a blank card and two or three colours.
Intermediate: baubles and shapes with depth
6. Wrapped-frame baubles. Trace a circle or star as a frame, tack a dot of filament to one edge, then wrap lines across and around it, as 3Doodler describes. Allow 30 to 40 minutes. You need a stencil, a frame colour and a wrapping colour.
7. Round baubles on a ping-pong ball. Draw two lattice halves over a taped ball, pop them off and join them into a hollow sphere. Allow about an hour. You need a ping-pong ball, masking tape, a nail file and ribbon.
8. A mini wreath. Draw a thick green ring from a stencil, then add leaves, red berry dots and a bow. Allow about an hour. You need green, red and white filament.
9. Named napkin rings. Wrap a kitchen-roll tube in masking tape, draw a band of holly around it, slide it off and add a guest’s name. Allow about 30 minutes per ring. You need a cardboard tube and tape.
Ambitious: a tree, letters and a house
10. A small standing tree. Four green triangles on a square base make a pyramid tree, with dotted baubles and a star. Allow two hours, over two sittings if you like. You need plenty of green, plus red and gold.
11. 3D lettering. A word such as JOY or NOEL, or the family name, to stand on a shelf. Draw each letter’s outline twice, join the copies with short upright lines all round the edge, then fill the front. Allow two to three hours for a short word. You need one main colour and letters printed in a bold font.
12. A snowy village house. Four walls with window gaps and two roof panels, joined, with white snow on the roof. Allow an afternoon. You need brown or red filament, white, clear for the windows and a battery LED tea light for inside. Never a real candle.
What you need for a December of decorating
You need a pen, filament in festive colours, a heat-proof mat with stencils, and a few odds and ends for hanging. If the pen itself is a present, start with our 3D pen gift guide; for a hot pen with fine control for the lettering, see our ranked list of 3D pens.
Filament colours
A Christmas palette is short: white, clear, red and green, plus gold or silver for stars and baubles. Clear suits snowflakes and the windows of the village house. The 3Dmate PLA Refill Kit covers it in one box: about 110 m of 1.75 mm PLA in standard, transparent, metallic and fluorescent shades, with a silicone mat, a stencil book and four finger guards. The pen isn’t included.
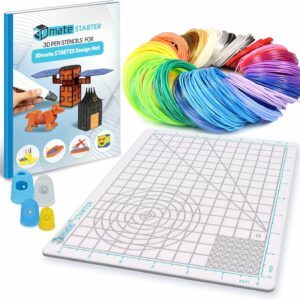
Metallic, transparent and fluorescent PLA, about 110 m in total, with the mat, stencils and finger guards a family session needs.
The 3Doodler Start+ takes only 3Doodler Start plastic or a compatible 2.5 mm pack, so 1.75 mm PLA doesn’t fit it, and its low-temperature plastic stays softer than PLA. It can join simple 3D shapes (3Doodler’s own robot and castle tutorials are written for it), but thin, tall pieces like the tree and the lettering hold their shape better in PLA. Our filament guide explains how PLA, ABS and PCL differ.
If you already have a mat, the Yungden 30-Colour PLA Refills give you 3 m of each colour, two transparent and four fluorescent among them: right for stars, tags and accents. For the tree or the house, buy one colour in bulk from our filament refills shelf. For a star that glows, see our guide to glow-in-the-dark filament for 3D pens.
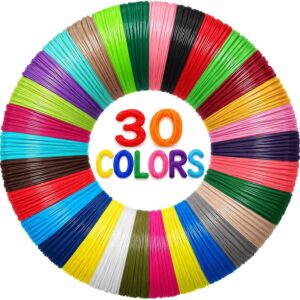
Thirty colours of 1.75 mm PLA at 3 m each, with clear shades for snowflakes and fluorescent ones for berries and stars.
A mat and stencils
Draw on silicone, never straight on the table: hot filament sticks to wood and melts plastic tablecloths. For a big mat with a published heat rating, the AQTAQ 3D Pen Starter Kit has a 45 × 28 cm silicone mat rated 220–260 °C, 40 templates and a transparent drawing board for tracing. 3Doodler also publishes free printable stencils for snowflakes, trees and gift tags. Mats, finger guards and cases are on our accessories and tools shelf.
For hanging and joining
Keep ribbon or strong thread, masking tape, a ping-pong ball, a kitchen-roll tube, a nail file and small scissors to hand. 3Doodler advises wrapping any mould in masking tape before you draw on it, so the piece comes off cleanly.
Two habits do most of the work. To join pieces, tack them together with a dot of filament at each corner, then draw along the whole seam, which is the method 3Doodler gives for building in 3D. To hang a piece, draw the loop as part of it, go round the loop twice and anchor it into several lines, not just one, so the ribbon can’t tear it off.
A standard 3D pen’s nozzle is hot: the SCRIB3D P1 runs at 160–210 °C for PLA and is for ages 14+ according to SCRIB3D’s product page (adult use only in its manual). Follow the pen maker’s age rating, and keep an adult beside younger drawers, with finger guards on. Never touch the tip, and unplug the pen and let the nozzle cool before you put it away.
Step outlines for three of the decorations
Stencil snowflake (easy)
- Tape the stencil under a clear sheet on your silicone mat.
- Trace the main arms first, working from the centre outwards.
- Add the side branches, touching each one onto an arm so the two fuse.
- Go over the thinnest arms a second time, because thin PLA lines snap easily.
- Draw a small loop at the tip of one arm and go round it twice.
- Let the piece cool on the mat, then peel it off slowly.
- Thread a ribbon through the loop.
Round bauble on a ping-pong ball (intermediate)
- Wrap a ping-pong ball tightly in masking tape.
- Draw a ring around its middle.
- Fill one half with loops or a lattice, joining every line to the ring.
- Let it cool, then slide a nail file or small scissors round the inside edge to pop the half off, as 3Doodler shows.
- Draw the second half the same way.
- Tack the two halves together at three or four points.
- Draw along the whole seam to close it.
- Add a loop at the top, anchored into several lattice lines, and thread a ribbon.
Small standing tree (ambitious)
- Draw a square base and fill it with a criss-cross pattern.
- Draw four matching green triangles from one stencil, with the bottom edge the same length as a side of the base.
- Fill each triangle with zigzags.
- Let every piece cool, then peel it off the mat.
- Lay the base flat and prop the first triangle against one edge.
- Tack the corners where the pieces meet, then draw along the whole joint.
- Join the second triangle to the base and to the sloping edge it shares with the first.
- Add the last two triangles the same way, then go over each sloping seam.
- Dot on red and gold baubles and fix a small flat star to the top.
The lettering and the house use the same joining method with more pieces. For practice pieces the rest of the year, see our easy 3D pen projects for beginners.
Where to display PLA decorations safely
Keep them away from warm bulbs and heaters, because PLA softens with heat. Prusa says PLA gets soft and deforms above 60 °C, and SUNLU puts the heat deflection temperature of its own PLA at 55 ± 5 °C. A snowflake resting against an old-style incandescent bulb, or lettering on a mantelpiece above a lit fire, can sag.
Tyne and Wear Fire and Rescue Service recommends LED lights because they generate little heat, and says to keep decorations away from heaters, lights, candles and other heat sources. On the tree, hang plastic pieces between the bulbs, not over them, and turn the lights off before bed.
PLA is also brittle: Prusa notes that it breaks into shards on impact. Hang pieces from a doubled loop and stand the tree and the letters on a shelf. If you own a 3D printer too, printed Christmas ornaments are the next step.
Common questions
How do I stop thin snowflake arms from snapping?
Go over every thin line a second time and join each branch firmly to an arm. PLA is brittle, so a thicker line lasts longer. Let the piece cool fully, then peel it off the mat slowly rather than bending it.
Can a 6-year-old make these with a 3Doodler Start+?
Yes, the flat ones and simple joined shapes. 3Doodler UK designs the Start+ for ages 6 to 13, and its own snowflake, tree and gift tag projects are written for its Start pen. The low-temperature plastic stays softer than PLA, so the standing tree and the lettering hold their shape better in PLA from a hot pen.
How should I store 3D pen decorations until next Christmas?
Wrap each piece in tissue and lay it flat in a box, with the tree and the letters on top. Keep the box somewhere cool and dry, away from radiators. Keep opened filament in a sealed bag too, as damp filament can bubble in a hot pen.
Sources
- PLA, material guide — Prusa Knowledge Base
- 12 Ways to Stay Safer this Christmas and New Year — Tyne and Wear Fire and Rescue Service
- Festive 3D Pen Crafts for Kids — 3Doodler
- Handmade Christmas Cards and Decor Ideas — 3Doodler
- How to Draw in 3D with a 3D Pen — 3Doodler
- STEAM Robot 3D Pen Tutorial — 3Doodler