
A 3D pen turns ordinary arts and crafts into something children can hold, hang and give away. The projects below are grouped by difficulty and time (15, 30 and 60 minutes), mixed with paper, card and things from the recycling box, and each ends with a use for the finished piece. Supervise as the maker of your pen advises.
Which pen for which age?
Follow the age rating set by the maker of the pen, not the age of the project. 3Doodler rates its Start+ for ages 6 to 13 and says it has no external hot parts. LIHUACHEN rates its RPC200B button pen for 7 and over; its ceramic nozzle gets hot, so under-tens draw with an adult beside them. SCRIB3D rates the SCRIB3D P1 for 14 and over. The Easy projects suit the youngest children each pen allows; the Ambitious ones suit older children who’ve finished a few easier pieces.
If you don’t own a pen yet, the 3Doodler Start+ is the one we’d start with for under-tens. Its low-temperature Start plastic stays softer than PLA, which suits cards and decorations well. It takes only Start plastic or refills made for it.
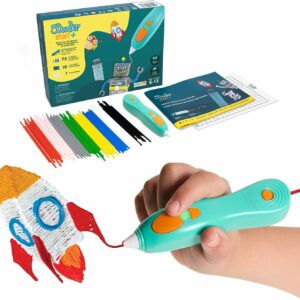
Rated by 3Doodler for ages 6 to 13 with no external hot parts, and the UK set includes 72 strands and an activity guide.
Ideas by difficulty
Easy: 15 minutes
- Star or heart for a card. Trace a shape from a template, let it cool, then glue it to the front of a folded card. Materials: template, card, glue dots. Finished piece: a birthday or Christmas card.
- Name bookmark. Write a name in joined-up letters along a straight line, then glue it to a strip of card. Materials: card strip, ruler, glue. Finished piece: a present for a teacher or grandparent.
- Snowflake hanging. Draw six spokes from a centre point and add small V shapes to each. Materials: template, thread. Finished piece: a tree or window decoration.
Our free printable 3D pen templates include outlines for these, and our easy projects for beginners have more ideas at this level.
Intermediate: 30 minutes
- Bottle-top creatures. Draw ears, eyes and whiskers, then glue them to a clean plastic bottle top to make a face. Materials: bottle tops, glue. Finished piece: fridge magnets (add a magnet with an adult) or desk friends.
- Pencil pot from a cardboard tube. Cover a cardboard tube with coloured paper and glue a base of card underneath. Draw flowers, stars or initials and glue them around it. Materials: cardboard tube, paper, card, glue. Finished piece: a gift for a desk.
- Pop-up flower card. Draw a flower with a long stem, fold a strip of card into a zigzag, and glue the flower to the top fold so it springs up when the card opens. Materials: card, scissors, glue.
For animal shapes step by step, see our 3D pen animals for kids.
Ambitious: 60 minutes
- Small gift box with a lid. Draw five squares for the box and one slightly larger square with short sides for the lid, then join them. Materials: square template, ruler. Finished piece: a box for a small present.
- Shoebox scene. Paint or paper the inside of a shoebox, then draw trees, figures and a sign to stand inside it. Materials: shoebox, paper, paint, glue. Finished piece: a winter village, a jungle or a scene from a favourite book.
- Window light-catcher. Trace a shape in transparent filament, filling it with close lines, and hang it where light passes through. Materials: transparent PLA, thread. Finished piece: a window decoration.
What you need: a materials checklist
Gather everything before the pen goes on, so no one leaves a hot pen to fetch the glue.
- The pen and the right refills: Start plastic for the 3Doodler Start+; 1.75 mm PLA for most other pens.
- A heat-proof silicone mat to draw on. Hot filament sticks to wood and melts plastic tablecloths.
- Finger guards for pens with a hot nozzle.
- Printed templates and a clear sheet or the mat to trace on.
- Craft basics: card, coloured paper, child-safe scissors, glue stick or glue dots, ruler, pencil, thread.
- From the recycling box: clean bottle tops, cardboard tubes, a shoebox, cereal-box card.
- A tray for finished pieces while they cool.
The AQTAQ 3D Pen Starter Kit covers several of these in one box: a 45 × 28 cm silicone mat rated 220–260 °C, 40 templates on double-sided sheets, a transparent drawing board, four finger guards and 50 m of 1.75 mm PLA in 10 colours. There’s no pen in the kit, and its PLA doesn’t fit the Start+.
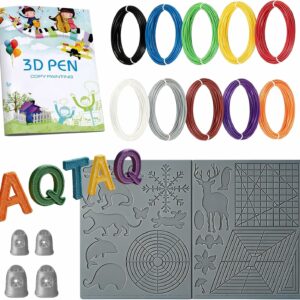
A large heat-rated mat, 40 templates and finger guards in one kit, for children using a pen that takes 1.75 mm PLA.
Step outline: star card (Easy)
- Print a star template and lay it under a clear sheet or on the mat.
- Switch the pen on and wait until it’s ready.
- Trace the outline slowly in one colour.
- Fill the inside with lines close together, or leave it open.
- Let the star cool on the mat, then peel it off.
- Fold a sheet of card in half and glue the star to the front.
- Write the message inside.
Drawing on the mat and gluing afterwards keeps the hot nozzle away from the card. Our guide to using 3D pen stencils for clean lines helps if the outline comes out wobbly.
Step outline: bottle-top creatures (Intermediate)
- Wash and dry a few bottle tops.
- Decide on an animal for each: cat, owl, frog.
- On the mat, draw two ears, two eyes and any whiskers or beak, small enough to fit the top.
- Let the pieces cool, then peel them off.
- Glue them to the flat face of the bottle top.
- An adult glues a small magnet to the back if it’s going on the fridge.
Keep the hot nozzle off the plastic bottle top itself; draw the parts separately and glue them on.
Step outline: gift box with a lid (Ambitious)
- Draw a square template on paper with a ruler, and a second one a few millimetres larger for the lid.
- Trace and fill five squares from the smaller template.
- Trace and fill one square from the larger template, then four thin strips for the lid’s sides.
- Let every piece cool.
- Stand two sides against the base and join them along the edge with the pen.
- Add the other two sides the same way.
- Join the strips to the larger square to make the lid, and check it fits over the box.
Joining pieces with the pen means holding parts close to the nozzle, so younger children do this step with an adult, or an adult does it for them. A box made with refills such as the 3Dmate PLA Refill Kit can use its metallic or transparent colours for a finish that looks more like a present.
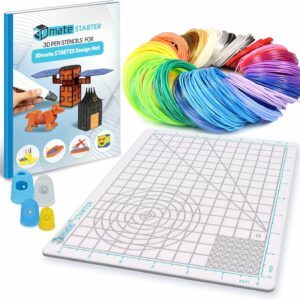
About 110 m of 1.75 mm PLA in standard, transparent, metallic and fluorescent colours, plus a silicone mat, a stencil book and four finger guards. The pen isn’t included.
Tidy-up and safety tips
Stay with younger children whenever a hot-nozzle pen is switched on, and keep to the age rating on the pen. If a child touches a hot nozzle or hot plastic, the NHS advises holding the burn under cool running water for 20 minutes, as soon as possible, and calling 111 (in the UK) or your usual source of medical advice if you’re not sure what to do.
- Draw on the mat, glue onto card. Keep the hot nozzle off paper, card and plastic packaging.
- Ventilate. 3Doodler recommends a well-ventilated area for all its filaments.
- No drawing on skin with hot pens. 3Doodler says its Start+ plastic can touch skin, but warns that its hot-nozzle pens will burn.
- Switch off and unplug corded pens as soon as the session ends, and let the nozzle cool before the pen goes back in its box.
- Trim stray strings with scissors once pieces are cold; an adult does this for younger children.
- Store strands sealed in a bag or box, and wipe the mat clean once it’s cool.
For a full week of activities, including plans for half-term or any week-long school break, see our week of 3D pen activities.
Common questions
Can you use a 3D pen on paper?
You can trace over paper templates, but it’s better to draw on a silicone mat or a clear sheet and glue the finished piece to paper or card afterwards. That keeps the hot nozzle away from the paper and lets the plastic peel off cleanly.
What glue sticks 3D pen plastic to card?
Glue dots and craft glue both work for light pieces on card. Press the piece down and let the glue dry fully before anyone handles the card. For heavier pieces, use more glue points rather than more glue.
How long does a 3D pen craft take?
A traced shape for a card takes around 15 minutes, a decorated pot or a set of bottle-top creatures around 30, and a box with a lid or a shoebox scene about an hour. Younger children may want to split longer projects over two sessions.
Can a 3D pen craft be a present?
Yes. Cards, bookmarks, decorations and small boxes all make good handmade presents. Let every piece cool fully and trim stray strings before wrapping it.
Sources
- 3Doodler Start+ Essentials 3D Printing Pen Set — 3Doodler UK
- FAQs — 3Doodler
- SCRIB3D P1 3D Printing Pen — SCRIB3D
- Burns and scalds — NHS