

Half-term has five weekdays, so this plan gives you one project a day, each using the skill learnt the day before: a bookmark on Monday, snowflakes on Tuesday, a cube on Wednesday, a robot on Thursday and an ice castle on Friday. For each of these 3D pen activities for kids you get the session time, the materials and the adult’s job. The plan is built around the 3Doodler Start+, which 3Doodler UK designs for ages 6 to 13, and it works with a hot pen for teenagers too.
Want something ready to trace? Download our free printable 3D pen templates, with shapes, letters and simple 3D builds on A4 pages.
What does the week look like?
Each day adds one skill to the ones before it: fill, outline, join, build boxes, then bend. Don’t skip ahead: Thursday’s robot is Wednesday’s cube with more pieces, and Friday’s castle needs both.
| Day | Project | New skill | Session | The adult’s job |
|---|---|---|---|---|
| Monday | Bookworm bookmark | Anchoring, tracing and filling | About 30 minutes | Charges the pen, prints the stencil, sets up the mat |
| Tuesday | Hanging snowflakes | Outlines where every line touches | About 30 minutes | Tests each join, ties the ribbon |
| Wednesday | Cube from six squares | Joining flat pieces | About 45 minutes | Rules the template, props up the sides |
| Thursday | STEAM Robot | Building boxes from many pieces | 30 to 45 minutes | Prints the stencil, keeps pieces A to E in order |
| Friday | Ice castle | Bending warm plastic, then a big assembly | 45 minutes or more | Sorts the pieces, steadies the walls |
The Thursday and Friday times are 3Doodler’s own; Monday to Wednesday are our planning guides, cooling included, not measured figures. Add time for setting up and tidying away.
Five projects, one a day
Every session starts the same way, as 3Doodler describes it: push the nozzle onto the paper, let the plastic flow for a couple of seconds, then lift and draw. Joins work the same way all week: while the pen is extruding, touch its tip to both pieces you want to fix together. If the pen is brand new, fit in a first practice hour on Sunday evening.
Easy: Monday and Tuesday
Monday: bookworm bookmark (flat fill). 3Doodler’s stencil library includes a bookworm bookmark. The child traces the outline, then fills it with lines that all run the same way and touch as they go. Keep it thin, one layer or two at most, so the book still closes. Allow about 30 minutes. You need the printed stencil, two or three colours and a mat or DoodlePad. The adult charges the pen the night before and shows the anchor once, then steps back.
Tuesday: hanging snowflakes (outlines). 3Doodler’s snowflake stencil is made for its Start pen: print it, trace it, add a loop at one end and thread a ribbon through. With no fill to hide a gap, every line has to touch the lines it crosses, or the snowflake falls apart when you lift it. That is Monday’s tracing plus a first taste of joining. Allow about 30 minutes for two or three. You need a pale colour and some ribbon. The adult lifts each snowflake by one arm to test the joins, then ties the ribbon for hanging.
Intermediate: Wednesday and Thursday
Wednesday: cube from six squares (joining). The cube is 3Doodler’s own example of building in 3D: six filled squares of 3 × 3 cm, joined edge to edge. Monday’s filling makes the faces, and Tuesday’s touching lines become proper joints. Allow about 45 minutes. You need a ruler and a pencil to draw the template. The adult rules the square and props each side piece against the base while the child fixes the corners. Steps below.
Thursday: STEAM Robot (building boxes). 3Doodler wrote this tutorial for the Start+, rates it intermediate and allows 30 to 45 minutes. The head and body are boxes traced from a free stencil and joined just like Wednesday’s cube, then arms, legs, a neck and a face go on. The adult prints the stencil and keeps the lettered pieces in order, so nothing goes missing between tracing and building. Steps below.
Ambitious: Friday
Friday: ice castle (bending, then a big build). Another 3Doodler tutorial for the Start+, rated intermediate, with 45 minutes for the basic castle. The new skill is bending: towers and walls are traced flat, then curved while the plastic is still soft. 3Doodler says you have about 5 seconds to shape Start+ plastic before it hardens, so bend each piece straight after drawing it. It’s the ambitious day because the castle can keep growing: 3Doodler suggests extra sides from two of the stencil’s shapes. The adult sorts the pieces and steadies the walls while the back goes on. Steps below.
What you need for the week
A pen that suits the child’s age
For children of 6 and up, we’d use the Start+. 3Doodler says it has no external hot parts, and 3Doodler UK designs it for ages 6 to 13. It’s rechargeable, has a stand-by mode, and according to 3Doodler UK comes with a charging cable, 72 strands of Start eco-filament and an activity guide. Refills must be 3Doodler Start plastic or a compatible 2.5 mm pack. That plastic stays softer than PLA, which limits fine detail, but the robot and the castle are written for the Start+, so it suits this week. According to 3Doodler, it needs about 30 seconds to warm up.
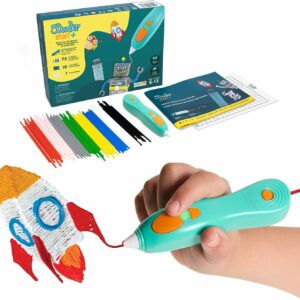
No external hot parts according to 3Doodler, designed for ages 6 to 13, and four of the five days follow 3Doodler designs offered for its Start pens.
For teenagers, the same stencil pages point to 3Doodler’s Flow pen, for ages 14 and up. The stencils are paper templates, so any hot pen that takes 1.75 mm PLA can trace them, within its maker’s age rating. You can compare them on our shelf of 3D pens for kids.
A mat, templates and refills
With a hot pen, a heat-rated silicone mat goes on the table before anything else. The AQTAQ 3D Pen Starter Kit‘s 45 × 28 cm mat has room to lay out all six cube faces, or the castle’s walls, at once. There’s no pen in the box, and the kit’s PLA is for hot pens, not the Start+.
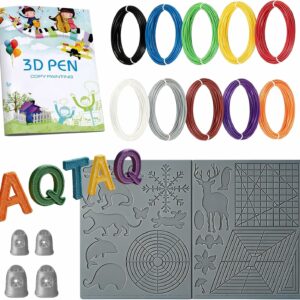
One mat for the whole week, plus spare templates for the afternoons after Friday. Bring your own hot pen.
For a hot pen, the Yungden 30-Colour PLA Refills give you 3 m of each of 30 colours, including two transparent shades for icy snowflakes and castle walls. Three metres per colour suits outlines and details; for the cube faces, one colour bought in bulk goes further. They don’t fit the Start+. Spare finger guards, mats and cases are on our accessories and tools shelf. Add a ruler, a pencil, ribbon, small scissors and a printer for the stencils.
The adult’s job, every day
With the Start+, the adult is the organiser. With a hot pen, the adult also sets it up on the mat, stays in the room for the whole session and unplugs it at the end. Under-tens should draw with an adult beside them, and every piece should cool before anyone peels it off. Burns, fumes and age ratings are covered in our guide to 3D pen safety for children.
Step outlines for three of the days
Wednesday: cube from six squares
- Draw a 3 × 3 cm square on paper and put it under a clear sheet on the mat.
- Trace and fill six squares the same way.
- Let them cool, then peel them off.
- Lay one square flat as the base.
- Prop a second square upright against one edge of the base.
- Add a little plastic at both corners where they meet to hold it.
- Draw along the whole joint to secure it.
- Add the next three sides the same way, joining each to the base and to its neighbour.
- Lay the last square on top as a lid and draw along its four edges.
Thursday: STEAM Robot
- Print 3Doodler’s free robot stencil.
- Trace the head pieces: A for the front and back, B for the sides, C for the top and bottom.
- Join them into a box with thin lines of plastic, holding each joint until it sets.
- Trace the body pieces: C for the sides, top and bottom, D for the back and E for the front.
- Join the body into a box the same way.
- Draw a face and colour details on the head.
- Draw the arms and legs and attach them to the body.
- Join the head to the body with a short neck piece.
Friday: ice castle
- Print 3Doodler’s free ice castle stencil.
- Trace two of shape E and fill them with looping lines, then bend each one into a curve.
- Trace the arch, shape B, fill it with back-and-forth lines and attach the two curves to it.
- Fill the front, shape A, with up-and-down lines and attach it to the sides.
- Trace four long walls from shape C with looping lines, and bend each one a few times.
- Attach two of the walls to the sides of the castle.
- Trace shape D, bend it and attach it to the tallest outer piece.
- Fix the last two walls to the back so the castle stands steady.
After half-term: where to go next
By Friday a child can fill, outline, join and bend. For more at the same level, fifteen beginner projects in learning order pick up from here. Mothering Sunday comes after February half-term, so the week is good practice for gifts children can make for Mothering Sunday. The Easter holidays bring eggs, baskets and cards to make, and the long break gets a six-week summer version of this plan. Children who enjoyed giving the robot a face can try step-by-step 3D pen animals next.
Common questions
Can a six-year-old manage the whole week?
Monday and Tuesday suit a six-year-old with the Start+, which 3Doodler UK designs for ages 6 to 13. 3Doodler rates the robot and the ice castle as intermediate, so a younger child may need an adult to sort the pieces and steady the joints. Split Friday into two sessions if attention runs out.
What if we miss a day?
Pick up where you stopped rather than skipping ahead. Each project uses the skill from the day before, and the cube is the practice run for the robot’s boxes. A weekend session can catch up the missing day.
Can older children follow the week with a hot 3D pen?
Yes, within the pen maker’s age rating. The stencils are printed on paper, so a hot pen can trace them too, and 3Doodler’s stencil pages suggest its Flow pen for ages 14 and up. Draw on a heat-rated silicone mat and keep an adult in the room while the pen is on.
Do I need to buy stencils for these projects?
No. The bookmark and snowflake designs are in 3Doodler’s online stencil library, and the robot and castle tutorials come with free stencils to print at home. For the cube, a ruler and a pencil are enough to draw a 3 × 3 cm square.
Sources
- Start+ getting started guide — 3Doodler
- How to Draw in 3D with a 3D Pen — 3Doodler
- 3D Pen Template and Stencil Library — 3Doodler
- Snowflakes 3D Pen Stencil — 3Doodler
- STEAM Robot 3D Pen Tutorial — 3Doodler
- Ice Castle — 3Doodler