

On a single-nozzle printer like the Bambu Lab A1, multicolour 3D printing means one nozzle and up to four spools: the AMS lite swaps the filament and the printer flushes out the old colour every time. It pays off when colours change by height or you fill a plate with copies, and wastes filament when every layer carries several colours.
Four colours in one print sounds like a free upgrade. In practice, every colour change costs filament and time, and the bill depends far more on the model than on the machine. Two printers in our catalogue take the AMS lite: the Bambu Lab A1 Combo and the Bambu Lab A1 mini.
How does multicolour printing work with one nozzle?
One nozzle prints every colour, one at a time. When the model needs a new colour, the printer cuts the filament, the AMS lite pulls the old strand back and feeds the new one, and the nozzle pushes out plastic until the new colour comes through clean.
What happens at every colour change
Bambu Lab describes the same steps for every swap:
- Cut. A cutter in the toolhead snips the filament, leaving a short length of the old colour in the extruder and nozzle.
- Swap. The AMS lite feeder for that slot pulls the old filament back out of the toolhead, then pushes the new one in until the extruder gears grip it.
- Flush. The old filament left below the cut is pushed through the nozzle, at the fastest flow the filament allows, into an area beside the build plate, until only the new colour comes out.
- Wipe. The nozzle moves back and forth over a wiper to drop the purged plastic and clean its tip.
- Prime. By default, the printer lays a little of the new colour into the prime tower, a sacrificial block printed next to your model, so the flow is steady before it returns to the part.
How much it flushes depends on the pair of colours. Going from a dark colour to a light one takes more, because a trace of dark pigment shows as a stained layer; light to dark takes less. Bambu Studio works out a flushing volume for every pair of colours in your project.
Where the extra time and filament go
Everything flushed or primed is waste, and it scales with the number of filament changes. On a single layer, the number of changes is usually the number of colours on that layer minus one, because the slicer starts each new layer with the colour it finished the last one on. Multiply that by every layer that carries more than one colour and the count climbs fast.
Bambu Lab’s own worked examples show how wide the range is. The mechanism is identical in every row; only the model’s layout changes.
| Example from Bambu Lab’s guide | Filament changes | Flushed filament | What it shows |
|---|---|---|---|
| Four-colour cube weighing 11 g, 0.2 mm layers | 153 | 83 g | Waste can outweigh the print many times over |
| The same cube at 0.28 mm layers | 111 | 61 g | Fewer layers mean fewer changes |
| Nine copies of the cube on one plate | 153 | 83 g in total | Copies share the same waste |
| A part with its colours in horizontal bands | 3 | 10 g | Colour by height is cheap |
| The same part laid on its side | 3 on every layer | 22 times as much, in a print 11 times longer | Colours side by side on every layer are expensive |
After slicing, Bambu Studio shows the number of filament changes and the filament used, so you can read the cost before you press print.
When is multicolour printing worth it?
It’s worth it when the colours sit in layers or bands, or when you can print several copies at once. It rarely is when small details in different colours run up the whole height of a model.
Signs, name plates and labels: usually yes
A door sign with raised letters is the textbook case. The base prints in one colour, and the colour changes once, at the height where the letters start. That’s the horizontal-band row in the table: a handful of changes and very little flushed plastic.
Flat labels and keyrings with colours side by side are different: every layer needs a change. They’re thin, though, so there aren’t many layers, and a full plate of copies shares the same flushing. A batch of identical name tags for a school club flushes no more filament than a single tag.
Toys and gifts: yes, if you plan the colours
Chunky toys built from separate parts work well. Bambu Studio lets you give each object or part its own filament, and if the parts can be glued or clipped together, you can print each one as its own single-colour job with no flushing at all.
The trap is the small detail high up: coloured eyes on a tall figure, say. The prime tower has to reach the highest layer with a colour change, so it climbs the whole height of the model in clean filament just to serve those last few layers. A dab of paint is often the better answer.
Functional parts and big single-colour prints: rarely
Brackets, clips and drawer organisers gain nothing from colour. The AMS lite still earns its place on those jobs in a different way: with filament backup switched on, it moves to another spool with the same brand, type, colour and nozzle temperature when one runs out, so a long single-colour print carries on.
Before any multicolour job, run this quick check:
- Slice the model and note the filament changes and the flushed weight.
- If the flushed filament weighs more than the model, try the fixes in the waste section below and slice again.
- If it still does, split the model into single-colour parts or paint the details instead.
What actually matters when you buy for multicolour
Number of colours
Four is the ceiling. Bambu Lab says the A1 series connects to a single AMS lite, which limits it to four-colour printing. Count the colours in the projects you have in mind: a sign with a base, lettering and a border needs three, which leaves a slot spare for a second spool of your main colour.
Spool size
The AMS lite takes spools 40–68 mm wide with a centre hole of 53–58 mm, according to Bambu Lab. Each slot has a rotary holder that turns a little after unloading to keep the filament on the spool taut.
Check both figures before you buy a stack of spools. The SUNLU PLA Filament in our catalogue, for example, is listed as 5.9 cm wide, which fits, but with a 6.3 cm hub hole, which sits above Bambu Lab’s published range. Feed that spool from the external spool holder, or check Bambu Lab’s advice before you load it into the feeder.
Materials the feeder takes
The A1 series’ open frame suits PLA, PETG and TPU, but the feeder is pickier than the printer. Bambu Lab’s FAQ says to keep soft TPU (95A, 85A, 83A, 80A or softer), TPE and absorbent PVA out of the AMS lite, along with third-party carbon- or glass-fibre filaments and glow-in-the-dark PLA. Harder TPU, 55D or 77D and up, is allowed, as are Bambu’s own PLA-CF and PETG-CF. For everyday multicolour work, that leaves standard PLA and PETG.
Bed size
A bigger bed doesn’t change how swaps work, but it fits more copies, and copies share the flushing. The A1 Combo prints on a 256 mm bed and the A1 mini on a 180 mm one. Size and desk space settle the rest of that choice, which our A1 mini vs A1 comparison works through.
Nozzle size
Flushing runs at the filament’s maximum flow rate, so a 0.2 mm nozzle takes noticeably longer per change than the standard 0.4 mm one, according to Bambu Lab. For multicolour work, stay with the 0.4 mm nozzle unless the detail really needs the smaller one.
Space and room conditions
Bambu Lab recommends using the AMS lite at 10–30 °C and below 85 % humidity. Keep it close to the printer, about 50 mm away in Bambu Lab’s guide, because tight bends in the PTFE tubes raise feeding resistance and can cause failed loads. Put the heavier spools in slots 2 and 3, where the centre of gravity is lower. On the A1, Bambu Lab also publishes a guide to mounting the AMS lite on top of the printer.
Software
Colour is assigned in the slicer. If slicers are new to you, start with how a slicer works. Bambu Studio’s colour painting tool has six brushes: circle, sphere, triangle, height range, fill and gap fill. The height range brush colours everything between two heights, which is how you set up those cheap horizontal bands; gap fill cleans up the stray specks that would otherwise add filament changes.
You don’t have to paint every model yourself. Bambu Studio saves the project’s filament list inside the 3MF file, so a model shared as a 3MF project can open with its colours already set out; our guide to free 3D model sites covers where to look.
How to cut the waste and the wait
Try these in order, slicing after each change and comparing the totals. All the figures come from Bambu Lab’s guide to reducing waste.
- Turn the model so colours change by height. Laying one tall, thin part on its side cut its filament changes and waste by almost 80 % and its print time by 70 %: 11 hours and almost 180 g saved on a part of about 35 g. Check it suits your model, though: the striped part in the table went the other way when laid down, and a part with no flat side needs extra support filament.
- Raise the layer height. Moving the four-colour cube from 0.2 to 0.28 mm layers took it from 153 changes and 83 g of waste to 111 changes and 61 g.
- Fill the plate. Copies share the waste, and different models help when they share colours on the same layers: two cubes and a plate scraper in the same colours wasted 133 g on one plate instead of 171 g on two. Stripes at different heights work against you: three traffic cones wasted 22 g printed separately and 72 g together.
- Flush into something useful. Flush into objects’ support is on by default, but only works with the prime tower enabled. Flush into objects’ infill hides purged plastic inside the part, but it can show through light or transparent colours and thin walls. Flush into this object prints extra parts in the purged plastic: in Bambu Lab’s example, a cube that would normally flush about 70 g sent less than 1 g to waste. Those extra parts come out in a mixed, uneven colour, so keep them for hidden or painted jobs, and make them about as tall as the multicolour part.
- Trim the flushing multiplier. The default is 1.00. Bambu Lab suggests 0.8 or 0.9 as a quick saving, followed by a test print: discoloured layers mean you’ve gone too low.
- Keep colour changes low in the model. Flipping a part so its colour changes sat at the bottom shrank its prime tower from 14.76 g to 9.05 g.
Our picks by reader profile
For colour from the first print: Bambu Lab A1 Combo
The A1 Combo includes the AMS lite, so four-colour signs, labels and toys work from the first day. Its 256 mm bed fits a full plate of name tags or keyrings, which is where multicolour waste per item drops, and it calibrates itself. Skip it if you’ll mostly print practical parts in one colour, or if your desk can’t take the printer and the feeder side by side.
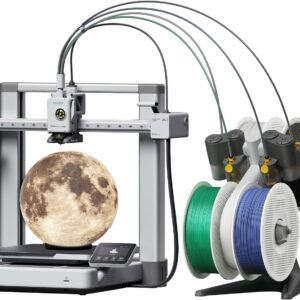
The AMS lite comes in the box, with up to four colours on a 256 mm bed: the simplest way to start multicolour printing.
For a small desk, or if colour is a maybe: Bambu Lab A1 mini
You can start the A1 mini without the AMS lite. Bambu Lab’s multicolour printing with an external spool pauses the print whenever a colour change is due, you swap the filament by hand and press continue, and it works even for changes within a layer. It needs up-to-date printer firmware and Bambu Studio. That suits a sign with two or three changes; a model with a hundred changes is a job for the feeder.
The AMS lite can follow later, sold separately or as the A1 mini Combo. The tubes supplied with a standalone AMS lite are cut for the A1 (two of 730 mm and two of 850 mm), while the A1 mini Combo uses 580 and 700 mm, so plan to reposition or shorten them. Skip the mini if you want hands-off swaps from day one and big plates of copies.
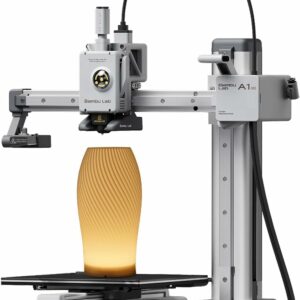
A 180 mm printer that does manual colour changes today and takes the AMS lite as an option when you’re ready.
If colour is rarely the point: Flashforge Adventurer 5M
If colour is a rare extra, a fast single-colour printer is the better use of your budget. The Flashforge Adventurer 5M prints one colour at a time on a 220 mm bed, at up to 600 mm/s, levels itself at one click and takes PLA and PETG, and TPU with its optional 0.6 mm nozzle. Skip it if you think you’ll want automatic colour changes later. For the wider field, see our ranked list of 3D printers.
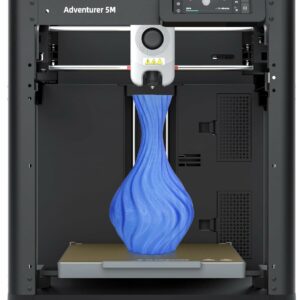
A fast CoreXY printer for practical parts in one colour, with a 220 mm bed and a nozzle that swaps in seconds.
What to avoid
- Soft TPU in the feeder. Bambu Lab rules out 95A TPU and softer, so the SUNLU TPU 95A Filament in our catalogue belongs on the external spool holder.
- Fibre-filled filaments from other brands, and glow PLA. Bambu Lab says carbon- and glass-fibre filaments can break inside the feeder channel or damage it; only its own smoother PLA-CF and PETG-CF are cleared for the AMS lite.
- Spools outside 40–68 mm wide or 53–58 mm at the hub. Check before you buy four.
- Tiny colour details at the top of tall models. The prime tower has to climb to meet them; paint them instead.
- Stripy models of different heights on one plate. Their colour changes multiply rather than share.
Common questions
Does the AMS lite work with other brands of filament?
Yes, if the spool fits and the material is one the feeder accepts. Each slot has an RFID coil that reads a tagged spool’s details; for third-party filament, you edit the type and colour yourself. For filament backup, Bambu Lab recommends pairing like with like, Bambu with Bambu and other brands with other brands.
What happens if a spool runs out during a multicolour print?
With filament backup switched on, the AMS lite moves to another spool with the same brand, type, colour and nozzle temperature. If no match is loaded, it shows a prompt that the slot has run out, so you can load a new spool.
Does the AMS lite work with Bambu Lab's X1 or P1 printers?
No. Bambu Lab says the AMS lite is not compatible with the X1 or P1 series, which use the full-size AMS instead. It’s made for the A1 and A1 mini.
Can I keep the AMS lite in a garage or shed?
Only if the space stays within Bambu Lab’s recommended range of 10–30 °C and below 85 % humidity. An unheated outbuilding in winter may not, so check with a thermometer and hygrometer before you set up there.
Sources
- Reduce Waste during Filament Change — Bambu Lab Wiki
- AMS lite FAQ — Bambu Lab Wiki
- Introduction to the modules and functions of AMS lite — Bambu Lab Wiki
- Multicolour Printing with External Spool — Bambu Lab Wiki
- Colour Painting Tool — Bambu Lab Wiki
- Multicolour Printing — Bambu Lab Wiki