
A 3D pen can mend cracks, snapped tabs and holes in rigid plastic if the filament matches the part: PLA on PLA, ABS on ABS. Read the code moulded on the part, clean it, cut a V-groove along the crack and fill it in thin layers. Never trust it on parts that carry weight, touch food or keep someone safe.
A 3D pen works like a very small plastic welder: it melts filament into the break. Polyvance, which makes plastic welders, explains why the plastic must match: you can’t weld steel with an aluminium rod, or ABS with a nylon rod. New to pens? Practise on scrap first with the basics of your first hour.
What can a 3D pen repair, and what can’t it?
A 3D pen can repair small, lightly loaded parts made of PLA or ABS. Both are thermoplastics: they melt and set again, so new plastic can fuse with the old. Thermosets such as polyurethane (PUR) and fibreglass don’t melt, and Polyvance warns that heating one destroys it.
| The job | Pen repair? | Why |
|---|---|---|
| Crack in a PLA or ABS 3D print | Yes | You know the plastic, and the area is small |
| Snapped clip or tab on a part marked >ABS< | Yes, for light duty | Same plastic, rebuilt in layers |
| Small hole or chipped corner | Yes | Fill from the edges inwards |
| Anything marked >PP< or >PE< | No | PLA and ABS won’t fuse with it |
| Thermosets (PUR, fibreglass) | No | They don’t melt |
| Brackets, chair parts, step stools | No | They carry weight |
| Cups, lunch boxes, utensils | No | They touch food |
| Chargers, plugs, helmets, stair gates | No | Electrical or safety parts |
Heat is the other limit: Prusa says PLA gets soft and deforms above 60 °C, so a PLA patch won’t last near a heater or in a hot car. Prusa also advises against any filament for direct food contact, because tiny grooves can support bacterial growth.
Don’t trust a pen repair with weight, food or anyone’s safety. Electrical Safety First says not to dismantle or attempt to repair faulty chargers: unplug a cracked one and contact the retailer or manufacturer. Replace helmets, car seats and stair gates rather than mending them.
Match the filament to the plastic first
Look on the back or inside of the part for a moulded code such as >ABS< or >PP<. It follows the ISO 11469 marking system, which uses the plastic abbreviations from ISO 1043. Polyvance’s repair guide puts this first: find the symbol, then match the welding rod to it.
| Code on the part | Plastic | What to use |
|---|---|---|
| >PLA<, or a print you made in PLA | Polylactic acid | PLA refills |
| >ABS< | Acrylonitrile butadiene styrene | ABS filament, in a ventilated room |
| >PP<, >PE<, >PE-HD< | Polypropylene, polyethylene | Not a pen job: needs a matching PP or PE rod |
| >PUR< | Thermoset polyurethane | Not a pen job: it won’t melt |
| No code | Unknown | Spot test on a hidden area first |
No code? Do Polyvance’s weld test: clean and sand a hidden spot, melt a dot of filament onto it, let it cool completely and pick at it. A mismatch should pop off easily. If neither holds, it isn’t a pen job.
None of the refills we list is ABS, so browse our filament refills for PLA parts and buy a 1.75 mm ABS refill for ABS ones. For a colour match on a PLA part, SCRIB3D PLA Refills come in 20 colours of about 4.9 m each, and SCRIB3D’s pen manual recommends its own filament.
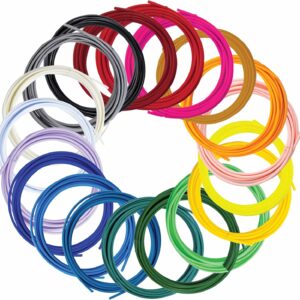
Twenty colours of 1.75 mm PLA from the pen’s own maker, with the same 160–210 °C range as the SCRIB3D P1’s PLA mode.
Our PLA and ABS comparison explains how the two behave in a pen, and our guide to PLA, ABS and PCL covers each filament in depth.
What you need
The SCRIB3D P1 takes both repair plastics: it has PLA and ABS modes for 1.75 mm filament, a stepless speed slider and a ceramic nozzle. PLA runs at 160–210 °C; for ABS, the manual gives 200–230 °C and SCRIB3D’s retail listing 210–235 °C. It runs from its 5 V 2 A adapter or, according to the manual, a power bank with at least 2 A output. SCRIB3D’s product page rates it 14+, and its manual says adult use only. Repairs mean craft knives and often ABS, so we’d keep this job for adults.
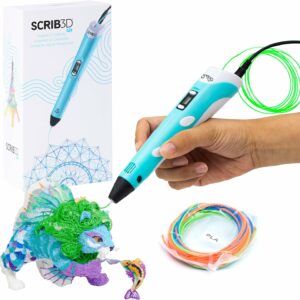
Separate PLA and ABS modes cover both common repair plastics, and the stepless slider lets you lay a slow, controlled bead.
- Matching filament, ideally in the same colour as the part.
- Tape to hold the visible face in line. Polyvance uses aluminium tape.
- A craft knife, needle file or rotary tool to cut the groove.
- Washing-up liquid, water, a cloth and 80- and 180-grit sandpaper.
- A silicone mat and a ventilated room. SCRIB3D’s manual warns that ABS can expose you to styrene.
Step by step: welding a crack
Stage 1: clean and line up the part
- Unplug the item the part belongs to.
- Remove the part only if the maker’s manual shows how.
- Wash both sides with soap and water.
- Dry it completely.
- Line up the visible face and tape across the crack on that side.
- Turn the part over: you weld the back first.
Stage 2: cut the V-groove
- Cut a V-shaped groove along the crack on the back.
- Go no deeper than about halfway through the wall.
- Brush out the dust. Polyvance says not to use cleaner after sanding or grinding.
The groove exposes fresh plastic and lets the filament sit inside the wall, not on top of it.
Stage 3: weld the back
- Load the matching filament and select the PLA or ABS mode.
- Set the speed slider low.
- Tack each end of the crack with a dot of plastic.
- Lay filament into the groove with the tip touching the plastic.
- Work in short sections of no more than about 5 cm.
- Go back over each section, layer on layer, until the groove is slightly overfilled.
- Let the weld cool completely to room temperature.
Polyvance calls melting the base plastic and the filament together essential for a good weld. 3Doodler suggests slow mode while you learn hand speed, and tacks corners before running along a joint. If the plastic bubbles or crackles, SCRIB3D’s manual says lower the temperature by 5–10 °C; if it looks dim and dark and the motor struggles, raise it by 5–10 °C. The P1 goes to sleep when idle: after 5 minutes according to the manual, 2 minutes according to SCRIB3D’s retail listing. Press any button to wake it and let it reheat.
Stage 4: weld the front
- Peel off the tape.
- Cut a narrow V-groove down the middle of the crack on the visible side.
- Make it deep enough to reach the weld on the back.
- Carry the groove about 6 mm past each end of the crack.
- Fill it in thin layers, as before.
- Let it cool completely.
For a small hole, tape across the back as a floor and build rings from the edge inwards. On thin walls, keep passes short and let each one cool, so the heat doesn’t distort the part.
Stage 5: sand it flush
- Sand the bead almost flush with 80-grit paper.
- Smooth the area around it with 180 grit.
- Wet-sand PLA: Prusa says sanding PLA needs water cooling.
- Unplug the pen and let the nozzle cool completely before you put it away.
Mistakes to avoid
- Using whatever filament is loaded. PLA on an ABS part can look fine, then pop off.
- Skipping the wash. Polyvance says thorough cleaning is how any repair gets its full strength.
- Welding a flat crack. Without a groove, the bead only sits on the surface.
- Doing the whole crack in one hot pass. Short sections keep thin plastic from sagging.
- Drawing with ABS in a closed room. Open a window or work somewhere ventilated.
- Putting the part back to heavy work. Neither SCRIB3D’s manual nor Polyvance’s guide gives a strength figure for a pen repair, so treat a mended part as lighter duty.
What to try next
Practise on an offcut of the same plastic before you touch a part you care about. Then rebuild a snapped tab or missing corner on one of your own prints, where you already know the filament. If your breakages keep turning out to be >PP< or >PE<, a pen isn’t the tool: Polyvance repairs those with a plastic welder and matching rods.
Common questions
Can I fix an ABS part with PLA filament?
Not reliably. Unmatched plastics don’t fuse properly, so a PLA bead on ABS may look fine and then pop off. If you’re unsure what the part is, do a spot test on a hidden area.
Is a 3D pen repair stronger than superglue?
No one publishes a strength test of pen repairs against glue. Polyvance, which makes plastic welders, says adhesives are often not as strong as welding, but they work on virtually any plastic apart from polyethylene and are essential for thermosets. A pen weld only has a chance of beating glue when the plastics match and the bead fuses into a groove.
Can a 3D pen fix a cracked car bumper?
Usually not. Polyvance says most car bumper covers are made of polypropylene blends, which PLA and ABS won’t fuse with. It repairs them with a plastic welder and matching polypropylene rod.
Can I repair a 3D print with a 3D pen?
Yes, and it’s the easiest repair to get right, because you know which filament the print used. Load the same plastic, ideally in the same colour, and fill the crack in thin layers.
Sources
- The Book of Plastic Repair — Polyvance
- User Manual Scrib3D P1 — SCRIB3D
- PLA — Prusa Knowledge Base
- How to Draw With a 3D Pen — 3Doodler
- BS EN ISO 11469: Plastics. Generic identification and marking of plastics products — BSI
- USB chargers — Electrical Safety First